
- How to Find the Best 5 String Violins - April 21, 2022
- How to Hold a Violin Bow - April 21, 2022
- How to Hold a Cello Bow - April 17, 2022
Summary: Knowing how to find the best cello fingerboard means appreciating the relationship between the size and structure of your fingerboard to other parts of the cello like the bridge. Different manufacturers have different standards for sizing, but a professional luthier can customize the best cello fingerboard to fit your instrument.
Many people put a great deal of effort into finding the perfect cello, but not as many people put effort into finding the best cello fingerboard unless theirs breaks. But there are plenty of situations where you might need to repair or replace the cello fingerboard that came with your instrument.
Why Do I Need a Cello Fingerboard?
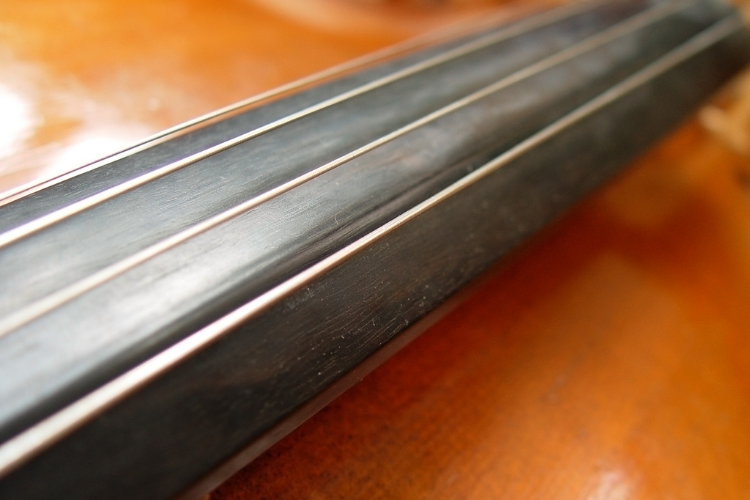
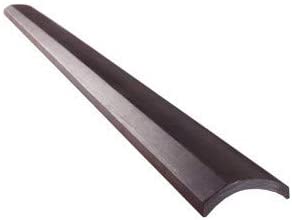
The cello fingerboard might seem like a flat section of wood or carbon fiber, but it’s a very complex three-dimensional part of your instrument. The best cello fingerboard is slightly hallowed along the length of the fingerboard. The fingerboard length and this hollowing are referred to as the “fingerboard scoop.”
It gets this name because it has a slight scoop that is not so concave that it stops your strings from working in the fifth and sixth positions but is hollow enough to produce a clean sound with no buzzing in the first, second, third positions.
What’s more, the best cello fingerboard should match perfectly with the curvature of your bridge so that you get an even progression along your strings from A to C.
A high-quality cello fingerboard has extra width and supports horizontally outside of the A string so that you can reach the strings comfortably without hurting your wrist. Concurrently, the flat section beneath the C string (called the Romberg) gives your left hand added security while playing.
Over the years, a great deal of work has been done to create the best cello fingerboard design, considering what produces the best quality sound, what is easiest with which to play, and what curves match with the cello bridge, your strings, and your playing style.
Frets and Playing the Cello Fingerboard
When you look at a guitar, you will see what are called “frets.” These are the wood or metal marks along the fingerboard. Your instrument won’t have these unless you invest in a fretted cello; your instrument won’t have these.
Frets stop your guitar strings when your finger presses down against them. There are pros and cons to having a fretted cello. Frets make it easier to play in perfect tune, but they make it harder to control the pitch, so musicians find it easier to control pitch on cellos without any frets.
If you are a beginner, part of your musical education will be learning the finger placement along the length of the fingerboard and memorizing where to put your fingers as you play.
Many people use the seven points method, which divides the sections of your cello fingerboard into seven equally sized portions for fractions. Memorizing each of the seven areas makes it simpler for you to produce the muscle memory necessary to put your fingers in the right place as you play.
There are, of course, many other methods of learning to play the cello. Some students put stickers along the fingerboard length until they memorize where to put their fingers. The way you use it should work for you, just like the best cello fingerboard should be something that works with your instrument.
How to Find the Best Cello Fingerboard
Knowing how to find the best cello fingerboard requires an appreciation of the different parts of the cello and how the fingerboard is related to these parts.
Cello Parts

Let’s start with the different parts of the cello. When I first picked up my instrument, I didn’t know what anything was called. I knew what the strings were; they were pretty easy to pick out.
After a few weeks, I heard people say words like endpin and scroll, which I figured out based on context. But beyond that, none of my music classes ever taught me the different parts of the cello; they just taught me the other notes and how to hold the instrument or where to put my fingers.
This was actually quite frustrating initially because teachers would use terms with which I was unfamiliar, which inhibited my progression. When a teacher would say, “your left hand should be above the F-hole” or “did you use your tuning pegs?”
I didn’t know what they were talking about, so I would just guess (placing my fingers wherever until the teacher finally moved my left hand for me or lying with a shaky “uh… yes?”).
Knowing the different parts of the cello will make it much easier for you to appreciate the craftsmanship and quality that goes into the best cello fingerboard.
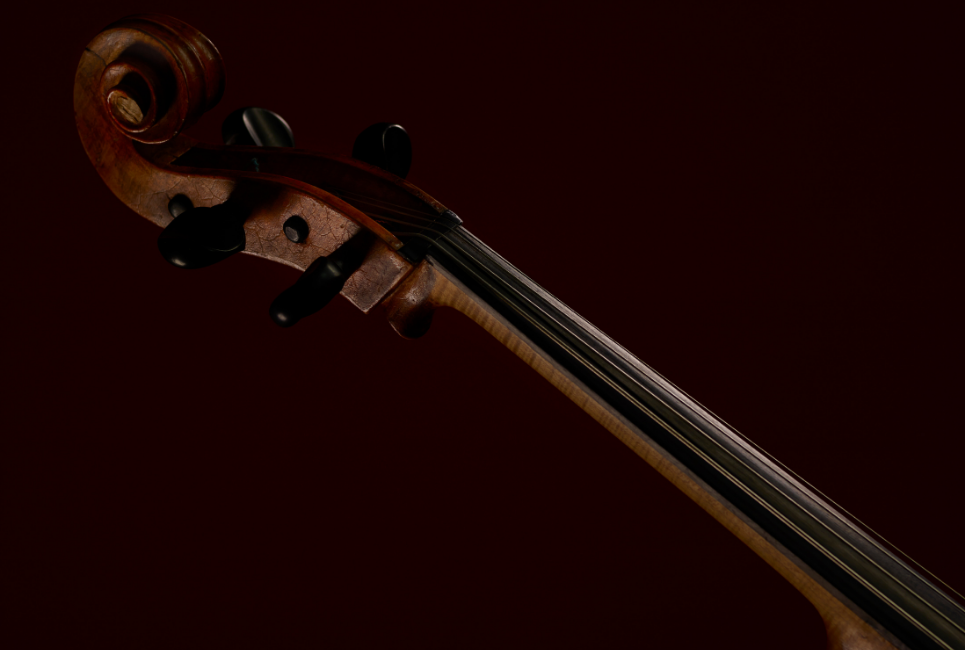
From top to bottom, you have the scroll all the way down to the endpin or tailpiece. The main structure of your instrument is called the body. This is subdivided into the upper about, which is the upper curved section, the waist, which curves inward, and the lower bout, which is the lower section that curves inward again.
The neck is the thin exposed part, just like your neck onto which is glued to the fingerboard. The fingerboard is usually black, and it stands out against the wood body and neck. On top of the fingerboard are the strings that run along the fingerboard, up and over the bridge in the middle of the body, and end down at the tailpiece.
I like to group my cello parts into the top section (peg box), the body, and all the other parts that have to do with the strings and sound I produce:
| Body |
|
| Peg Box |
|
| Strings |
|
Cello Bridge and Cello Fingerboard Curves
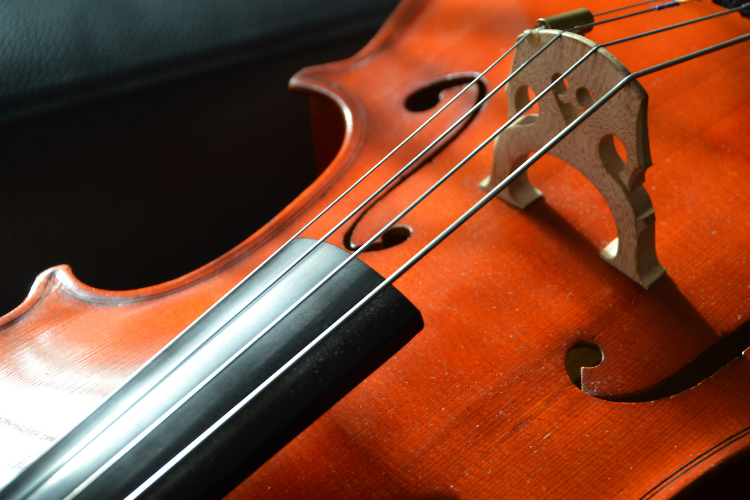
Now that you have a better understanding of the parts, it’s good to know how they are related. The bridge is slightly curved, and it hoists the strings up off the cello’s body. This gives you good clearance for your bow.
The fingerboard has to line up with the curvature of this bridge. It doesn’t match it precisely because it is farther away along the body of your cello rather than sitting right next to the bridge, but it still has a matching curve.
So, if you get a replacement fingerboard, you will need to use a professional luthier who can finely-tuned or customize the shape to match the existing bridge on your instrument.
This matching is referred to as the fingerboard profile. The profile has to match the curve of the bridge; otherwise, the strings will sit at different heights on the surface of the fingerboard.
If one string is sitting disproportionately higher on the fingerboard than the string next to it, the first string gets stretched even more when you press your finger to the fingerboard, and it will give you a higher pitch than it should.
Eventually, this will make it very difficult for you to tune 5ths or higher as you play. This also causes problems with your bowing clearance when you start to run your bow across higher positions. You will also begin to put in an uneven degree of effort with your fingers to play each of your strings, and this is bad muscle memory to develop.
Size
Handcrafted instruments are subject to the designs of the manufacturer. If you look at five different three-quarter size cellos, they might have a difference of a few inches in height or width, just the same as different cello fingerboards might be slightly larger or smaller in size.
Generally, fingerboards are around 270 mm long, 5 mm tall, 24 mm wide at the top of the fingerboard, and 41 mm wide at the bottom.
The best cello fingerboard is angled so that when the string is pressed down, there is room to vibrate. Again, this is very important. If you had a flat fingerboard when the strings pressed against it, the entire string would press against it, and you wouldn’t be able to generate different sounds along the length of the fingerboard.
Fingerboards are also manufactured at an angle that requires the strings held at the correct height about your bridge, which I’ve talked about at length.
Material
Fingerboards are almost always made of ebony. They must be hardwood, so ebony is the traditional material, while rosewood is also found on older cellos. Today, modern cellos have integrated carbon fiber for its environmental friendliness and durability; carbon fiber is strong and lightweight, reducing the weight of the cello by 10%.
When You Need to Repair or Replace Your Cello Fingerboard

Your instrument will tell you when something is wrong. It will tell you when to repair or replace your cello fingerboard.
As you play regularly, no matter the material for your fingerboard, you will wear it down. Where your fingers rest along the fingerboard will create a very orderly set of ripples. I have an antique cello, which is displayed in my living room.
I haven’t replaced it because I like seeing the 200 years’ worth of ripples are very clearly seen in a structured pattern all the way down the length of the fretboard.
In addition to the horizontal ripples that you will see from your fingers, the more you play, the more you will create vertical grooves that correspond to each of your strings. The strings will naturally wear grooves into the fingerboard.
If you start to feel a jarring of your strings in these small indentations or hear a buzzing sound when you play, it might be time to repair or replace your cello fingerboard.
- A good luthier can sand away the grooves or ripples in your cello fingerboard through a process called truing or shooting. You can only do this a few times because eventually, you will sand away most of the material, and there won’t be anything left on which to play.
- When this happens, it’s time to replace the fingerboard entirely. You can switch materials; you don’t have to stay with the original material. You can also return your fingerboard if you buy a new instrument and don’t like the one that came on your instrument.
Fingerboard Recommendations
Orchestral fingerboards are best bought by luthiers as instrument makers are more likely to carve their fingerboards. Luthiers have known suppliers that they trust and buy from; some of these relationships may be based on years of working together. However, many people out there want to try their hand at building a cello. Those new to this process may be a kit with pre-cut pieces to get a feel, or they may be things like fingerboards at first to focus on getting the body right. Still, boughten fingerboards need to have a final carve and adjustment so they can fit your instrument.
Due to the nature of fingerboards, you won’t find that many online, but I’ve rounded up two selections that are sure to please.
Maderas Barber Fingerboards
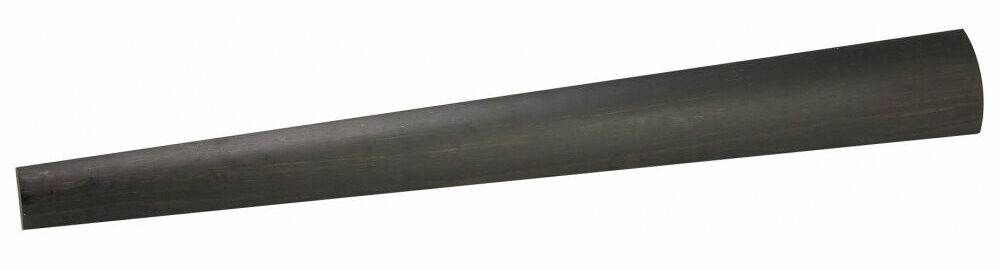
Maderas Barber sells tonewoods and other violin building accessories. They sell various fingerboards at different price points and quality levels from B-AAA and carving types like beveled or round. The difference in the grade is in the wood quality and the final result. They also sell uncarved fingerboard blocks that are perfect for the builder that wants to try shaping their fingerboard. You can find everything you need to build an orchestral string instrument here; they even sell material for other projects like walking sticks and kits.
Pros
- Quality pre-shaped ebony fingerboards
- Ebony block chosen and cut for fingerboards available
- One-stop-shop for everything orchestral string building
- Fairly priced for quality products
Cons
- Can’t visually and physically inspect it before buying
JinQu Cello Fingerboard
The JinQu Cello Fingerboard on Amazon is conveniently located on trusty Amazon, unfortunately without prime shipping. Available in 4/4 and 3/4 sizes, this fingerboard is a pre-shaped hill style ready for final shaping. Made from high-quality ebony, it’s a great choice; however, it doesn’t come with the options or range that Maderas does. You can’t get the same level of quality, but it’s still a good choice for an enthusiast.
Pros
- 100% pre-shaped ebony
- Inexpensive for full size
Cons
- From a lesser-known brand
- Doesn’t have the same choices as Maderas
FAQ
Answer: Every instrument is slightly different. The size of your cello fingerboard will vary based on the size of the instrument you have. Children with a fractional-sized cello will have smaller cello fingerboards than adults with a full-size cello.
Answer: As mentioned, there are different methods and learning styles for memorizing the layout of your cello fingerboard. Some people find it easier to conceptualize where the notes fall for each position, while others prefer to memorize the distance between the positions and feel that out while they play.
This is something that will take lots of time and practice. Some students and beginners prefer fingering tape like thin graphic chart tape to mark their fingers playing along the fingerboard. This type of tape won’t damage the fingerboard and can be removed once you have memorized the layout.
Answer: This depends entirely on how often you play and your personal preferences. Advanced musicians might change their cello fingerboard with a replacement every five or six months, while beginners can keep the same cello fingerboard for five years or longer.
The more often you play or perform, the faster you wear grooves and ripples into the fingerboard. The grooves and ripples will determine when you have to replace your fingerboard.
Bottomline
The bottom line is that you should repair and replace your cello fingerboard regarding how often you play. Finding the best cello fingerboard as a replacement means matching the quality and material you prefer to the size of your instrument. I always recommend working with a professional luthier to repair or replace any damaged cello fingerboard.
Looking for more interesting readings? Check out: