
- How to Find the Best Violin Shoulder Rest - April 12, 2022
- How to String a Violin – A Guide to Changing Violin Strings - April 3, 2022
- How to Tune a Violin: A Guide to Tuning the Violin - March 21, 2022
This step-by-step guide will explain exactly how to change your violin strings safely and efficiently! There aren’t many things that can go wrong, but it can be a fiddly process the first few times. If you’ve never changed your strings before or seen it done, you might ask your violin teacher, luthier or an experienced player to show you.
Bottom Line Up Front
Only remove one string at a time! Turn the peg towards the violin’s body to release the string, then gently pull it out of the peg-hole and slide the ball-end out of the tailpiece. Clean the exposed parts of the violin, then attach the new string by wedging the ball-end into the tailpiece and threading the other end into the peg-hole. Simple! Below you’ll find step-by-step instructions about how to do this precisely.

How Often Should I Change My Strings?
It depends on how much you play, your kind of repertoire, and how well you maintain your strings.
- If you play for an hour or more per day, you’ll need to change the set of strings within six months. It’s likely your E string will only last 3-4 months. If you’re playing a few hours a week at most, your strings will sound good for approximately a year and the E string a little less than that.
- Repertoire can require different kinds of ‘heavy playing’ that will wear your strings out faster. A few examples are continuous loud playing, 4-string chords, extensive pizzicato, and Bartok pizz.
- Regularly cleaning your strings will preserve their quality for longer. Wipe them with a cotton or thin flannel cloth each time you finish playing. Every month or so, you can do a deeper clean by carefully wiping the strings with pure alcohol or a string-cleaner. Make sure no alcohol falls on the wood or fingerboard when you do this! The best way is to push a thin cloth under the strings to cover the fingerboard and surrounding wood, protecting it. Then apply a small amount of alcohol to another cloth and wipe the strings.
Note: a build-up of rosin, sweat and dust can make the string dull or squeaky. If they’re only a few months old and are already sounding bad, try to deep-clean them before buying new ones!
Some Signs Your Strings Are Getting Worn:
- Lack of resonance – the violin’s sound is dull or doesn’t project. When you play two open strings together, the perfect fifth doesn’t resonate as it should do.
- Fraying – a point on a string doesn’t feel smooth. If you look closely, you may see it starting to unravel.
- Thinning – part of a string is thinner than it should be
In Which Order Should I Re-string?
There’s no absolute rule for this. However, I prefer first to change the outer strings (G and E). I find it easier to avoid the strings crossing each other in the peg-box or coming into contact, which can create a buzz.
Before You Change Your Strings
- Purchase your replacement strings. If you know which brand you’d like to buy, it’s often easier to order online as not all music shops stock an extensive range of violin strings. Ensure you order the appropriate end for your E string; all brands offer ball-ends and loop-ends. If you’re unsure which ones to buy, see below for brands I recommend!
- Check your pegs and fine-tuners are in good condition. If they’re too stiff/loose, changing strings will be tricky! You can use a small amount of peg paste to prevent the pegs from slipping. Try it out before changing your strings; if it doesn’t work, I recommend taking the violin to a luthier as pegs can get worn down to the point they’re too small for the peg holes. If the fine-tuners are stiff, you’ll need to remove them entirely from the tailpiece and give them a thorough clean. Apply vaseline or a similar lubricant to loosen them before re-attaching to the tailpiece.
What You’ll Need
- Four strings
- A sharp lead pencil
- A clean cloth
- Bright lighting
Step 1
Sit down and hold the violin securely on your lap. Release all four pegs slightly. As the tension from the four strings keeps the bridge, tailpiece and soundpost in place, you want to avoid a sudden, massive change in pressure. Turn the pegs slowly and gently, then check and adjust the bridge’s angle before fully releasing the peg of the string you want to change. Try not to pull the peg out of the pegbox; release it just enough to remove the string easily.
Step 2
Remove the string by gently pulling it out of the peg. Then slide the other end of the string backwards so that you can pull the ball up through the tailpiece. If it’s not severely damaged, keep it in the spare-string tube in your violin case, so you always have a spare.
Optional: If you’re not in a rush, give the newly exposed parts of the fingerboard, peg-box and tailpiece a thorough clean with a cloth. A lot of rosin gets trapped under the string, and dust gathers in the pegbox.
Step 3
Use a sharp lead pencil to draw a few lines into the appropriate groove on the bridge and nut (the very top of the fingerboard, just underneath the peg-box). Over time, strings can wear the wood down and deepen these grooves. This causes the strings to sit too low for the height of the fingerboard. A thin, protective layer of lead prevents this from happening.
Step 4
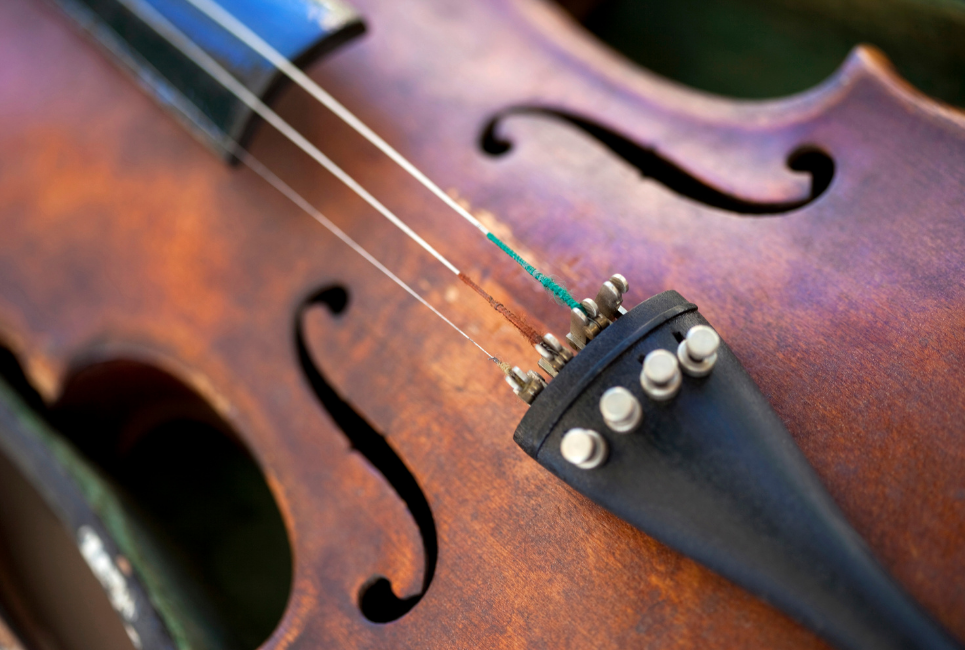
Now it’s time to attach the new string. Take the ball end (see just below for fine-tuners and loop-hole E strings) and push it through the circular hole in the tailpiece. With your thumb and index finger, pull the string gently away from the circle to the edge of the narrow opening.
If you have fine-tuners, place the ball-end between the tailpiece and fine-tuner, then wedge the string between the two prongs and pull gently towards the bridge.
Some E string fine-tuners will have a hook instead of prongs; in this case, you need to buy a loop-end string. Simply place the loop over the hook.
Note: I prefer to do the less fiddly part first ( i.e. inserting the ball ends) as the string is slightly more stable when threading into the peg holes. However, you can swap steps 4 and 5 over.
Step 5
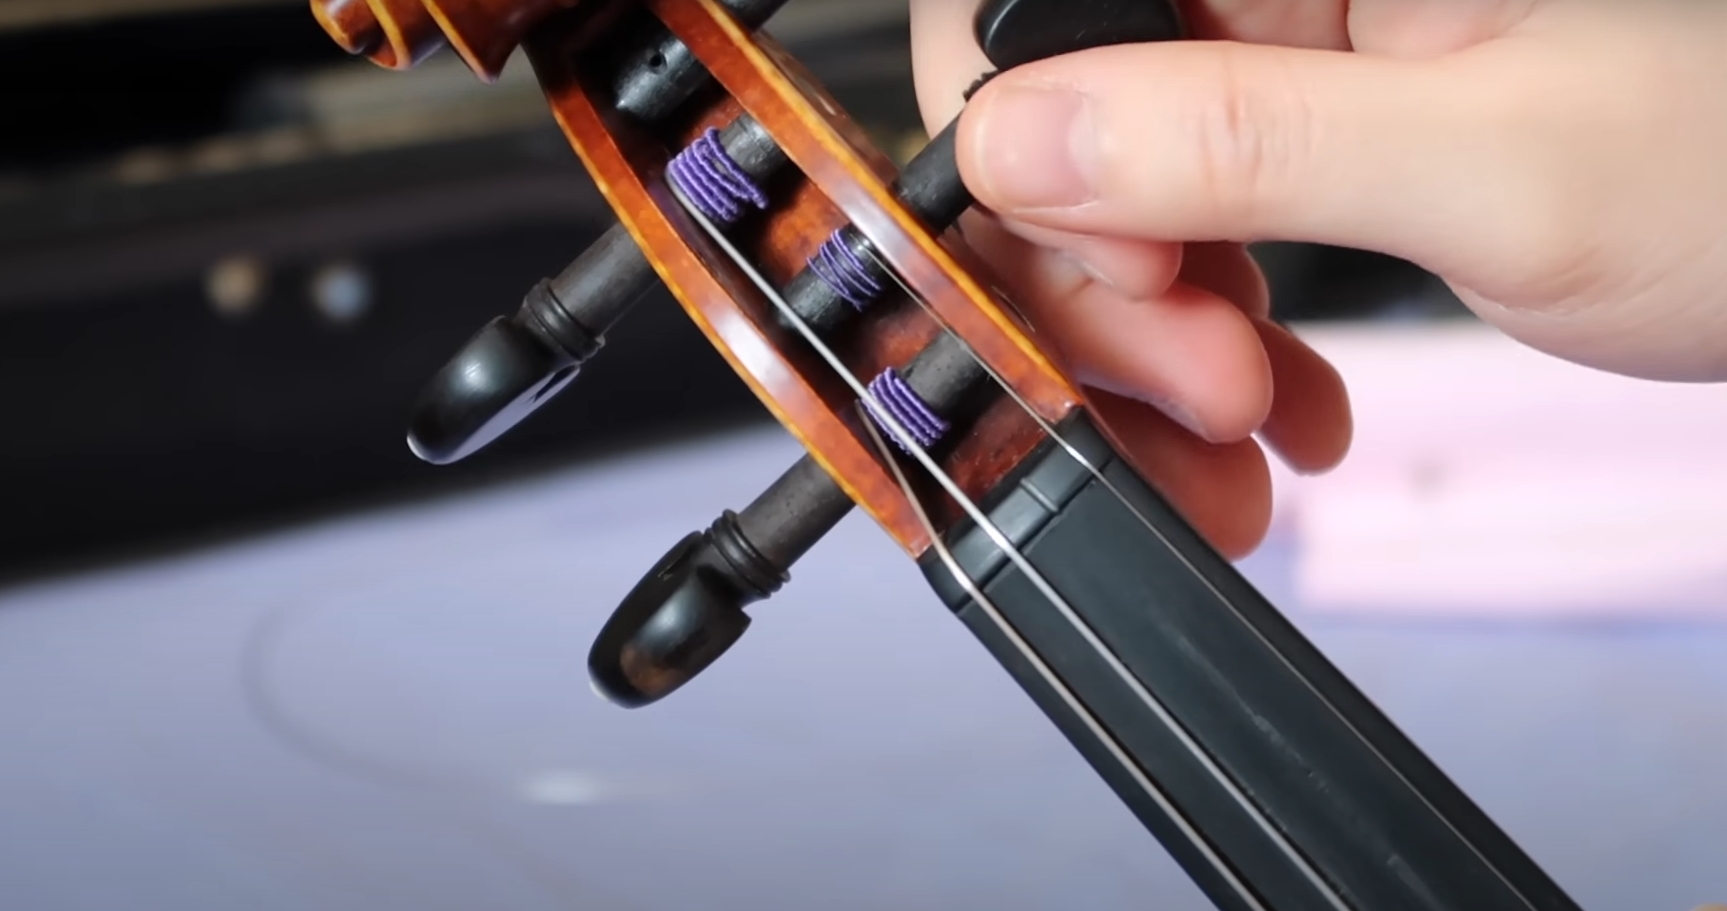
Draw the string upwards along the fingerboard to approximately the halfway point, and hold the string down with one hand. With the other hand, take the remaining piece of string and thread the end into the tiny hole in the peg. Push it through, allowing 7-10 mm to stick out of the other side.
The string should be flush against the fingerboard between the tailpiece and the point where you’re holding it down and in a big curve between the holding point and the pegs.
Step 6
Without letting go of the string against the fingerboard, slowly start to wind the peg. Ideally, you want to pin down the little bit of string sticking out of the peg hole with the first few winds. This is quite difficult to do, but aim to wind the string ‘neatly’: as close to the inner wall of the peg-box as possible. The pressure of the wound strings helps prevent the pegs from slipping when tuning; this works if they form a little barrier next to the pegbox.
Don’t push the pegs whilst you turn at first, or they’ll get stuck before the string is completely wound.
Leave a little slack if you’re going to change other strings now, don’t wind to sounding pitch.
Step 7
Check the angle of the bridge, and don’t hesitate to adjust it if it’s moved slightly (it might have fallen towards the chinrest). Wonky bridges are the most critical risk when changing strings; if they’re held in place at an off-angle for a few weeks, the wood can warp and need to be replaced. A new bridge is much more expensive than a new string!
Note: An excellent way to check the bridge angle precisely is to align the violin with a tile on the floor. Hold the violin so that the belly matches the horizontal side of the tile. If the bridge is perfectly perpendicular, it will align with the vertical side of the tile. Make sure that the two feet of the bridge are entirely in contact with the violin top.
Step 8
Congratulations, you’ve changed your string! Now you can repeat steps 2-6 for another string, or if that’s not necessary, tune your string(/s) up to playing pitch.
Playing with New Strings
New strings will continuously go flat for a couple of days as they settle in; just keep tuning and playing; it’s the best way to speed up the process! You can pull the strings sideways to stretch them, but be especially careful when tugging the E string as it can snap.
Depending on the string type, you might find the sound brittle or harsh for a few days. Just press on; the more you play, the quicker the sound will become rich and warm.
Strings I recommend
For Fractional Violin Sizes: D’addario Helicore

Sets of Helicore for small-sized violins remain affordable while matching the quality of 4/4 high-end brands. The strings are thinner, so the diameter to length ratio is the same as 4/4 strings. I always recommend them to students.
For Hobbyists: Thomastick Dominant

These popular strings are good all-rounders and highly durable. In the mid-price range, they work well on the majority of instruments. They might sound harsh or tinny for the first few days but will soon settle.
For Professionals and Aspiring Professionals
I suggest trying a range of high-end strings and buying them separately instead of in sets. You may come across the perfect brand for your G string but need something different for your E string. Your violin may benefit from brilliant, synthetic strings if it’s less powerful in the high register or more mellow gut-core strings if the sound is too bright.
Take a look at the Pirastro range, Larsen strings and Thomastick-Infeld range.
Strings I Use

For several years now, I’ve used Pirastro Obbligato for my G, D and A strings and Evah Pirazzi Gold for my E string. I find Obbligato focused, warm and durable, and the Pirazzi Gold gives some extra brilliance to my violin’s high register.

FAQ
Answer: To adjust the bridge:
• Sit down and place the violin stably on your lap.
• Hold the sides of the bridge between your thumbs and index fingers, with your hands lightly resting on the violin top to stop it from slipping.
• Pinch the bridge firmly and bring it back to a 90% angle from the violin top.
• See ‘step 4’ above for checking the bridge alignment.
Answer: Ideally, change your strings about two weeks before a meaningful event, so the strings have time to settle in but are still new. However, if a string breaks on the same day as the concert, it’s not the end of the world! Just play on it as much as possible before the event begins.
Answer: It depends on the kind of concert. If you’re playing solo or in a chamber group, you’ll need to stop, go offstage, re-string and come back.
That said, the 18th-century Italian virtuoso Niccolò Paganini would purposefully break all strings except his G string on stage and continue to perform on just one string! He wrote several pieces for the G string only, including the Napoleon Sonata and the Moses variations.
In some orchestras, the tradition still stands of passing on your violin to the player in front of you. Either the last violinist directly gives their violin to the player who broke their string and leaves the stage 🙁 or several players do this to avoid disrupting the music. Here’s an example of this happening!
Answer: If a string snaps abruptly whilst you’re playing, it’s possible that part of it will fly backwards and could graze your face. Whilst this is a minor hazard, it can be a big shock! If you have a young child, check up on their strings every few weeks to ensure they’re in good condition.
Answer: Synthetic and steel strings can last for decades if kept unopened in their packets. However, gut strings will expire – historical and baroque players tend to change their strings much more frequently than modern players.
Answer: You can send your used metal/synthetic strings to the ‘D’addario String Recycling Center’ and earn points in their ‘players circle’ program if you’re based in the US. Unfortunately, equivalent organisations do not yet exist in other parts of the world.
Alternatively, you can donate your old strings to a musical charity like ‘Open Strings’ or the ‘Rachel Barton Pine Foundation’ so musicians with little access to necessary materials can benefit.
Conclusion
Like with many practical skills, you may feel clumsy and slow the first time you change your violin strings by yourself. It will take a few tries before you’re re-threading and winding nimbly. Don’t be put off, and don’t forget to change your strings every few months!
Looking for more interesting readings? Check out: